
This guest post is by Jeff Delacruz a founding member & photographer at Products On White Photography.
If there’s one thing that’s true when it comes to ecommerce, it's that the perceived value of your products and the trustworthiness of your business is often judged by the quality of your web design. And a big part of having an attractive website these days also means having high-quality, beautiful product photography.
But it's not just aesthetics we're talking about. Showcasing your products with high-quality images can also be the winning difference between a conversion and no sale at all. This is particularly true if you’re also distributing your products on marketplace sites like Amazon where they are displayed alongside those of your competitors.
But when you're just starting out, getting your product photos shot can be an intimidating prospect because good photography can be expensive. There are hundreds of product photography tools to help you get the job done yourself. As business owners with lean start-up roots, we understand this more than anyone, and as a company that works with small businesses everyday, we also know that sometimes the money’s just not there. If that’s you, and your budget is tight, have you thought about taking the DIY approach to taking your own images? It’s not as hard as you might think.
There are lots of techniques for shooting successful product photography, but the one I’m going to show you is commonly known as The Window Light Technique. From someone who photographs products everyday, this tutorial has been specifically crafted for business owners on a budget, and it’s been designed to be simple while producing excellent high quality results with most product types.
Enjoy!
What You’re Going to Need

Gear is at the heart of photography and can be really exciting, but typically it’s the aspect that most people become confused about.
There’s no necessity to spend a large portion of your budget on high-tech equipment, so keep an open mind and try not to overspend on gadgets that do the same job lighting your product as a $5 piece of card can do. You can probably do this window light setup for $20 or less if you already own a camera.
You’re only going to need a few things for this setup:
1. Camera

You don’t need a crazy camera system. While shooting images with a Nikon D800 ($2796) sporting a 105mm f1.4 lens ($740) is awesome, it’s also totally unnecessary.
Still, if you’re feeling excited, and have the budget to stretch to a new camera system for this project, I suggest reading a post I wrote on quora which offers tips to help you pick out a good camera for product photography.
When I did the test images for this, I started with my older model (2008), beat-to-hell Canon G10 point-and-shoot. I love the Canon G series point-and-shoots because they can go full manual and they shoot a really nice raw file. I picked this camera because it’s definitely not top of the line anymore, allowing me to demonstrate that even with modest equipment, good results are attainable.
So what camera do you need? I would just start out with whatever you have handy and see what the results are. It’s a common myth that it’s the camera that takes the pictures, but in reality the camera is only one piece of the whole. A photograph is made up of series of choices that incorporates lighting, exposure, styling and post processing decisions.
2. Tripod
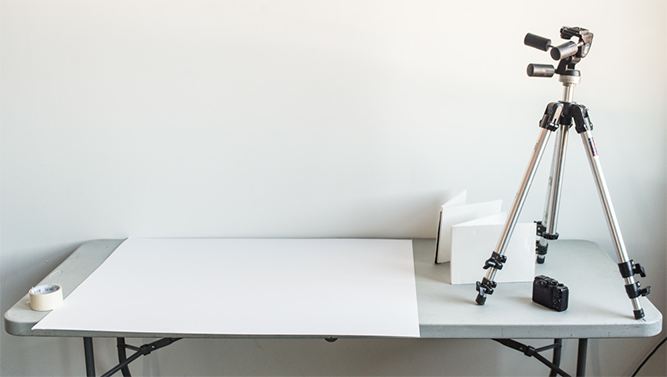
Not to get too technical, but you’re going to set your camera to a very small aperture so that you can have the most depth of field your camera is capable of.
The width of the depth of field defines the area of sharp focus, and to get to that you need the largest f/stop number your camera can obtain. Shutter speed and f/stop are related, and since a larger f/stop number like f/8 lets in less light, you’ll need to counter than by using a slower shutter speed to allow more light through.
When a camera has a slow shutter, you can’t hand hold it or the subject will be blurry – so a tripod is your answer. If you’re interested in learning more about the fundamentals of photography, check out this video I did with Harrington College of Design last year.
I realize that most point-and-shoots may not allow you to choose your f/stop. That’s ok and there are ways to get around this which we’ll discuss in the step-by-step.
Again, you shouldn’t need to spend a whole lot of money on a tripod at this point in your adventure, and there are many, many options out there that are under $30. I did a quick search on Amazon and found something that would work for $20.
3. White Background

There are lots of options for a white background and if you’re going to be shooting a lot, you may want to go to your local photography store and get a small white sweep.
If you’re not in an area with a good photography store, you can always head over to your frame shop/art store and get a 32x40 sheet of their thinnest white Mat Board, which is what we’re using in this example.
Look for something that you can bend a little bit to create a sweep. You can usually get this for under $7. Remember to look for pure white as off-white or cream, while cool, will be more difficult to make pure white.
4. White Bounce Cards Made of Foamcore
While you’re at the art store/frame shop, ask them if they have any extra scraps of white foamcore you can buy. You only need a piece roughly the height of your product, and about 3x the width. Typically, a letter size will work. We like to bend ours in half, like in the above example, so that it will stand up on its own. Its purpose is to bounce light back onto the product.
5. Table
A standard folding table works best, and a width that’s between 24 and 27 inch wide is ideal.
6. Tape
Depending on the table you end up with, you can use tape or clamps to secure down your board so that it sweeps properly.
7. The Right Room
A room with windows next to a wall is perfect, and the bigger the window, the more light you’ll get in.
How to Photograph Your Product on a White Background
Alright, let's get into the step by step process for shooting your photos.
Step 1: Set Up Your Table

Once you have collected your gear together, it’s time to set up your shooting area. Place your table as close to the window as possible without intersecting the shadow from the windowsill. You’ll want to start with the window 90 degrees to the right or left of your setup. The closer you are to the window and the larger the window, the softer the light will be.
Also, remember to turn off all other lights inside the room you’re shooting in as other light will contaminate the set.
Variations:
You can try rotating the set so the window is at 45 degrees to the set, or try it with the window straight onto the set for a different style of lighting. Food photography is often shot with a window behind the setup and the camera shooting into the window for a more dramatic setup. Another variation is setting up in a garage with the door open, it will have the same qualities of light as a window, just without the glass.
Tips:
You do not want direct sunlight hitting your set. Direct sunlight is harsh and looks bad on most people and products.

Step 2: Set Up Your Sweep
There are a lot of ways to do this, but the ultimate goal is to have your mat board sweep from being flat on your table to being vertical. You may need to roll up the board to help it reach that shape.
In my set-up, we placed the table against the wall and taped the sweep to the wall and the table. If you don’t have a wall, you’re going to have make something to secure the back of the sweep to. Some bricks or a wooden block would work well.
In my set-up, we placed the table against the wall and taped the sweep to the wall and the table. If you don’t have a wall, you’re going to have make something to secure the back of the sweep to. Some bricks or a wooden block would work well.
Place your product in the center on the flat part of the sweep and leave enough room to sneak your white reflector card in later. In this case, our product is a cool Skyrim & Doom toy available from Symbiote Studios. Thanks guys!
Step 3: Set Up Your Camera

- Set Your White Balance (WB) to Auto.
- Turn your flash setting to off
- Image Settings – set it to the largest quality settings:
- Set it to raw if you have it. Most point and shoot cameras don’t have this setting, but if you do then use it. This file is the largest file the camera can shoot, and utilizes the full bitdepth of the camera. You will have to edit in a software that reads raw imagery though, like Photoshop, Bridge, Lightroom or Aperture.
- If you don’t have raw, set it to the largest JPG setting you have. In my canon there are 2 settings to look out for:Size – sometimes L (large), M- (medium) S- (small) Pick large. This setting determines the file size, and you almost always want to shoot it at its largest file size for optimal image quality. You can always shrink an image once it is take but you can’t make it larger.Quality – S (Superfine), F (fine), N ( normal). You should always set it to Superfine. This setting determines the number of pixels that are used on the camera sensor. Not using all the available pixels will render a lower quality image.
- Set your ISO to 100: The ISO controls the sensitivity of the sensor. The higher the ISO the more noise there is. Typically, the lowest ISO you can set your camera to is ISO 100, so set it there if you can.
- Exposure Settings
 Option A: Set your camera to Manual (M)
This is the best setting for this type of work because nothing will be moving or changing as you take the pictures. In manual, change your f/stop to the highest number, which will give you the greatest depth of field.Preview the image on the back of the camera through liveview. Everything is probably pretty dark, which is ok. Now, switch to your shutter speed and rotate the dial to make it bright enough that the image is properly exposed. Your shutter number should be going down. For example, your number may go from 1/60th to ¼ . These are fractions of a second that your shutter will be open for and as the number lowers it will let more light in. Adjust this number until the preview of the image is correct.Option B: Use Aperture Priority, Av…
Your camera may not have this either, but if it does, change the f/stop to the highest number. This should automatically adjust the shutter to be what the camera thinks it should be. This may be wrong and you may need to use the exposure compensation dial to add light.Option C: Auto Exposure
If you’re stuck in the all-auto world, there may not be much you can do. Don’t fret, it’s not a big deal. If you have an exposure compensation dial, you will most likely need to add +1 or +1 ½ to get the correct exposure. If all you have is the running man images to choose from, try picking something like sunset. With the iPhone, just tap the area you want exposed properly.Use the Histogram on the back of the camera. You’re looking for the slope to be closer to the right hand side like in the image above.Exposure Tip: Don’t trust the image on the back of the camera, instead pay attention to the histogram to know if your exposure is correct. The far right hand side is white, and left is black. In the example image there is a little gap on the right hand side which means that there is no pure white. Adjust the exposure till the part of the curve representing the white background is touching the right edge without going over. In this example, you would probably need to add 1/3 of a stop, or one click for more light.
- Zoom In
Cameras typically have an optical zoom and a digital zoom. Don’t use the digital zoom as this will lower the quality of the image - it’s essentially just cropping the digital image. If you have an optical zoom, try zooming in as far as you can without going digital zoom. A longer zoom will remove distortion caused by a wide angle lens.
Step 5: Set Up Your Product in the Middle of the Surface
Setting up your product is one of those things that seems simple, but can take time to position correctly. If it’s a bottle, pay attention to keeping the label type centered. Many times there are lots of tiny movements needed to get everything lining up perfectly.
Step 6: Set Up the Reflector Card
This simple white card is the single most important light modifier we have in our studio and we use it with everything. The light will bounce off the card and fill in all the shadows. How you position this card is matter of taste, so try it at different angles to the product.
Step 7: Take the Picture and Evaluate
Once you take the picture, take some time and really look at what you’ve created. This is where experience and education comes into play – what’s working, what isn’t working and what can you do to make it bettser. Experiment with different ways of making your image better and over time you’re skills will naturally improve.
Upload your images onto your computer to get a better idea of how they look. The back of your camera is never very accurate. I suggest using Adobe Lightroom to organize all your images, and it can be used to do almost all of your editing except very advanced processes. You’ll no doubt need to make some adjustments to the images to get them to look right.
Post production software like Adobe Lightroom is very in-depth and we won’t have time to go into the details of using it because it’s just too much.
Post production software like Adobe Lightroom is very in-depth and we won’t have time to go into the details of using it because it’s just too much.


Step 8: Get Your Pictures Retouched
Once you’ve got a final image you’re happy with, it’s time to get it retouched. If you photographed your product correctly, the product should be exposed properly and your background a light grey. It should look something like the un-retouched image above, and comparing it to retouched version shows you how important this step of the process actually is.
The retouching tasks associated with on-white photography, for someone without a lot of training, can be tricky, and tend to be the weak link for most people trying to photograph products themselves. So, instead of trying to teach you advanced Photoshop, I’m going to show you how to outsource it.
You’d be surprised how affordable this can be. From around $4 - $10 an image, you can have a professional retouching company improve your images for you. Finding a good company can be tough, but one company that works best for consumers is Mister Clipping. They have an office in New York City, so you’re not trying to correspond with someone overseas, and they’re super-friendly.
You’d be surprised how affordable this can be. From around $4 - $10 an image, you can have a professional retouching company improve your images for you. Finding a good company can be tough, but one company that works best for consumers is Mister Clipping. They have an office in New York City, so you’re not trying to correspond with someone overseas, and they’re super-friendly.
Their process is simple. Just create an account, upload your images and they’ll give you a quote.
For the directions write:
Make the background 255 white. Keep the hard shadow under the product and fade the long shadow. Enhance the product contrast and correct for color. Spot product and fix damaged areas. Correct for distortion. Deliver Full resolution jpegs with no compression.

Step 9: Upload Your Pictures to Your Website
Once you get your images back, it’s time to upload them to your site.
If you’re using Shopify you’re lucky, as it resizes the images for you. You have no idea how many websites I see where the image is the wrong size. When this happens the image becomes skewed and stretched, ruining all the work you put into the image.
With Shopify, completed images will be ready to load directly into your store, thanks to some handy software that prepares and resizes the images automatically for you. Some other CMS platforms, like Wordpress, also have this capability.
Uploading Images to your Site for Non-Shopify Site Owners
If your online store doesn’t resize the images for you - perhaps you have a custom built site - you’ll need to crop your images to the correct dimensions and then resize the image.
Step 1: Find Your Image Size
Images, particularly jpegs, do not enlarge well, so you want your final image to start as large as your camera will shoot it. If your camera shoots a 4416 x 3312 pixels size image than this means that you can shrink this image by cropping or down-resizing (shrinking it proportionally) to a smaller size. The not so technical industry term is down-rezing referring to
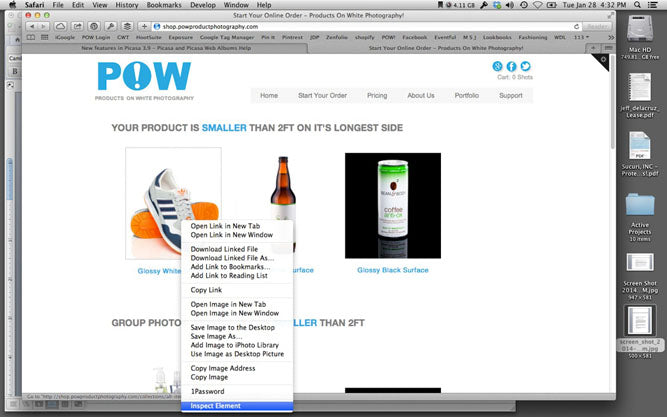
To find your image size, right click on the image on your website to inspect the image. You’ll see the dimensions in two areas. Each browser’s ‘inspect element’ is a little different. I’m using Safari in the above image example.
Step 2: Crop Your Images to Size in Lightroom
Chances are your images will need to be cropped to fit the exact dimensions required by your website, but thankfully this is something you can manage easily in Lightroom, but entering a custom crop size.


With your images in Lightroom, click the image you want to crop and go into the ‘develop’ menu. Click where it says ‘original’ next to the lock icon, and click again on ‘custom’. In ‘custom’, enter in the size you acquired from ‘inspect element’, and click ok to crop your image.

Step 3: Export Your Images to the New Size Using Lightroom
Once you’ve cropped the image, it’s time to export the final cropped image for upload to your site. Start by right clicking and selecting ‘export’. The important part is how you set the file settings and image sizing:
- Image Format: Jpeg
- Quality: Between 70 – 90, 100 is typically not necessary.
- Colorspace: Srgb (anything on the web must have this colorspace set)
- Resize to fit: Width and Height – match your crop size
- Resolution: 72 pixels per inch (this is a standard screen res)
Everything else is up to you, or self-explanatory. Press ‘export’ and upload your images.
Conclusion
There you have it! The simple ‘how to take your own products on white photography the easy way, without having to buy tons of gear and complicated lighting’ article.
If you try this, please post an image of your setup and a final image so everyone can see what you did. We’d love to see the results!


